Welcome! My name is Gaming Existence, this is my guest blog on Karl.gg! You can find out more about me at the end of the article, for now we are looking at the fire spread mechanic and why it can be extremely powerful.
Apologies if on mobile the images are not displaying correctly. Looking into see if I can resolve this and find the balance between it working on desktop and mobile devices.
Below are some helpful points to help you skip what you know and get straight to what you want to discover:
1. Fire/temperature damage, how it works
2. Why the fire DOT is good
3. Why the radial heat and fire spread is amazing!
4. Summary
5. Additional info
Fire/temperature damage, how it works
All classes have opportunities open to them to deal some kind fire damage and or heat damage to enemies. Below I will cover how the basics work as it can get confusing. At the end of the blog there will be additional information available. This Boomstick case study covers only one type of fire damage / heat damage conversion. There are others that work differently and if you really want to get your head stuck into the options make sure you check out the additional info section!
This example is from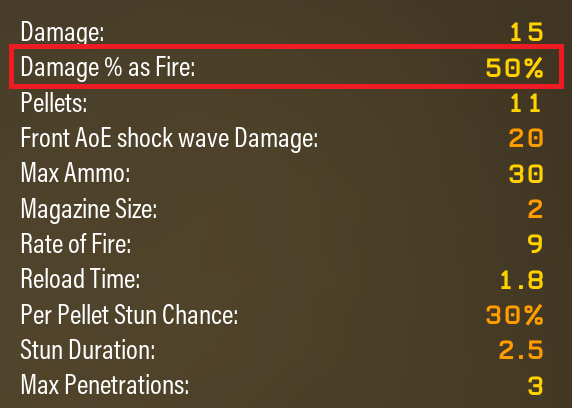 the Scout’s Boomstick when we take the White Phosphorus gear mod. Highlighted in red displays that 50% of our damage is going to be dealt as fire damage instead of all 100% being kinetic.
This means creatures with fire resist will take less damage on our direct hits, dropping our DPS vs targets such as Oppressors and Dreadnoughts. We also have the flip side with creatures like Mactera taking more damage.
We need to go into the Wiki to understand a bit more of exactly how this specific gear mod works though as fire damage is only one part of the equation.
"Fire damage does not inherently make you deal heat damage, and heat damage does not make you deal fire damage, they are separate mechanics"
For example, Thin Containment Field on the EPC deals fire damage but no heat damage so can’t ignite targets. Plasma burn on the EPC applies heat damage but it does not deal any direct fire damage. Confused yet!?

We can see above from the Wiki that the gear mod does not only convert 50% of our damage to fire as the in-game description states, it also converts it into heat damage which can allow us to ignite targets. We don’t lose damage which is how the PGL Incendiary Compound gear mod works where 50% of our damage is lost and converted into heat damage. Heat damage only increases temperature, it does not deal DPS, more on this later.
In the case of the Boomstick, think of it this way. The in-game gun stats image above states that we deal 15 damage per pellet. Now that pellet will deal 7.5 kinetic damage (Our normal damage but 50%), 7.5 fire damage (impacted by resistances the other 50%), and 7.5 heat damage (not actual health damage but used to increase temperature on the target).
Confusing but key differences! Once again remember to look at the end of article for more details on these nuances.
For the purposes of this article, the most important thing we are looking at is does the overclock; gear mod; or weapon, allow us to deal heat damage and potentially make it so we can set our target on fire? Our Boomstick example does!
When a target takes heat damage the temperature on that creature will start to increase. Heat damage despite its name does not deal any hit point damage to the target. 100 Heat damage will only increase the temperature of the creature, compared to 100 fire damage which will deal health damage.
 After a target has taken enough heat damage in a short enough window, the targets temperature can reach a point where it will ignite and get the “On Fire” status effect. Turning the heat icon from red/black to white/red to indicate the target now has the “On Fire” status effect.
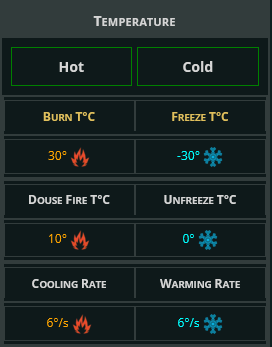
Each creature has different stats for how easy or hard it is to ignite them and how long that status will last on them. This example is from a Slasher.
We can see the amount of heat it will require to ignite this Slasher but also the cooling rate and the “Douse” temperature (the temperature at which it will no longer be ignited). Often a douse temperature will leave some residue heat in the target.
The cooling rate is 6 degrees per second on our Slasher, we know when it gets to 10 degrees it will no longer be on fire. This means at 30 degrees heat we have just over 3 seconds of the Slasher being on fire if we don’t cause any additional heat to it.
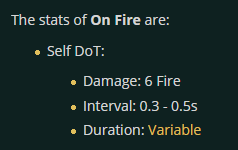 When a target is “On Fire” we gain a DOT (damage over time effect). 6 damage with variable intervals between 0.3 and 0.5 seconds. At worst, 12 damage a second ignoring any resistances or best case, just over 18 damage a second.
Resistances will lower this DOT damage and again, vice versa, deal more damage on targets like Mactera.
 Targets that are on fire cause “Radial Heat” damage around them. 5 Heat damage every second. This is not additional damage that lowers hit points but will start to raise the temperature on the target. When the temperature gets high enough, it can ignite and then start taking additional DPS in the form of the on-fire status effect with its DOT damage.
Why the fire DOT is good
The fire DOT is essentially additional DPS beyond potentially what our ammo used can deal. In this example below we can see the Boomstick with one ammo used deals 80.8 damage to this Slasher. Without the fire DOT it would survive and require an additional shot to kill.
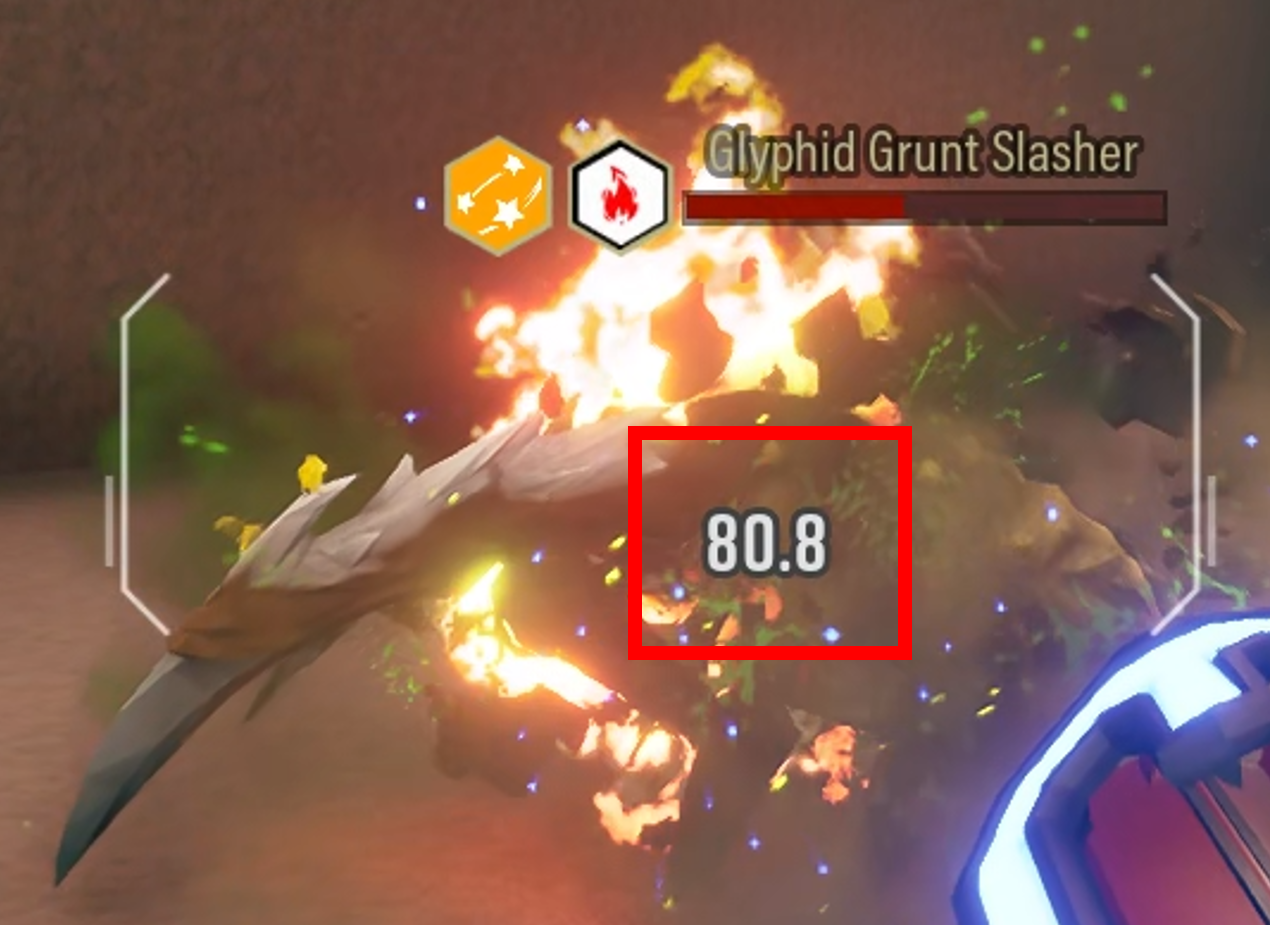
But with the fire DOT in the images below, we can see the damage ticks of 5.0 damage, this is accounting for Haz-5 global resistances (Image table below). The TTK (Time to kill) is longer compared to if we fired a second shot to finish off the Slasher. A longer TTK is bad you might say, but we will come back to why that might be good in the next section!
We save 50% ammo in killing this slasher, one shot instead of two, at the cost of TTK. This ammo saving when we factor in weapons with low ammo count such as the Boomstick or Inferno Breach Cutter can be extremely valuable.
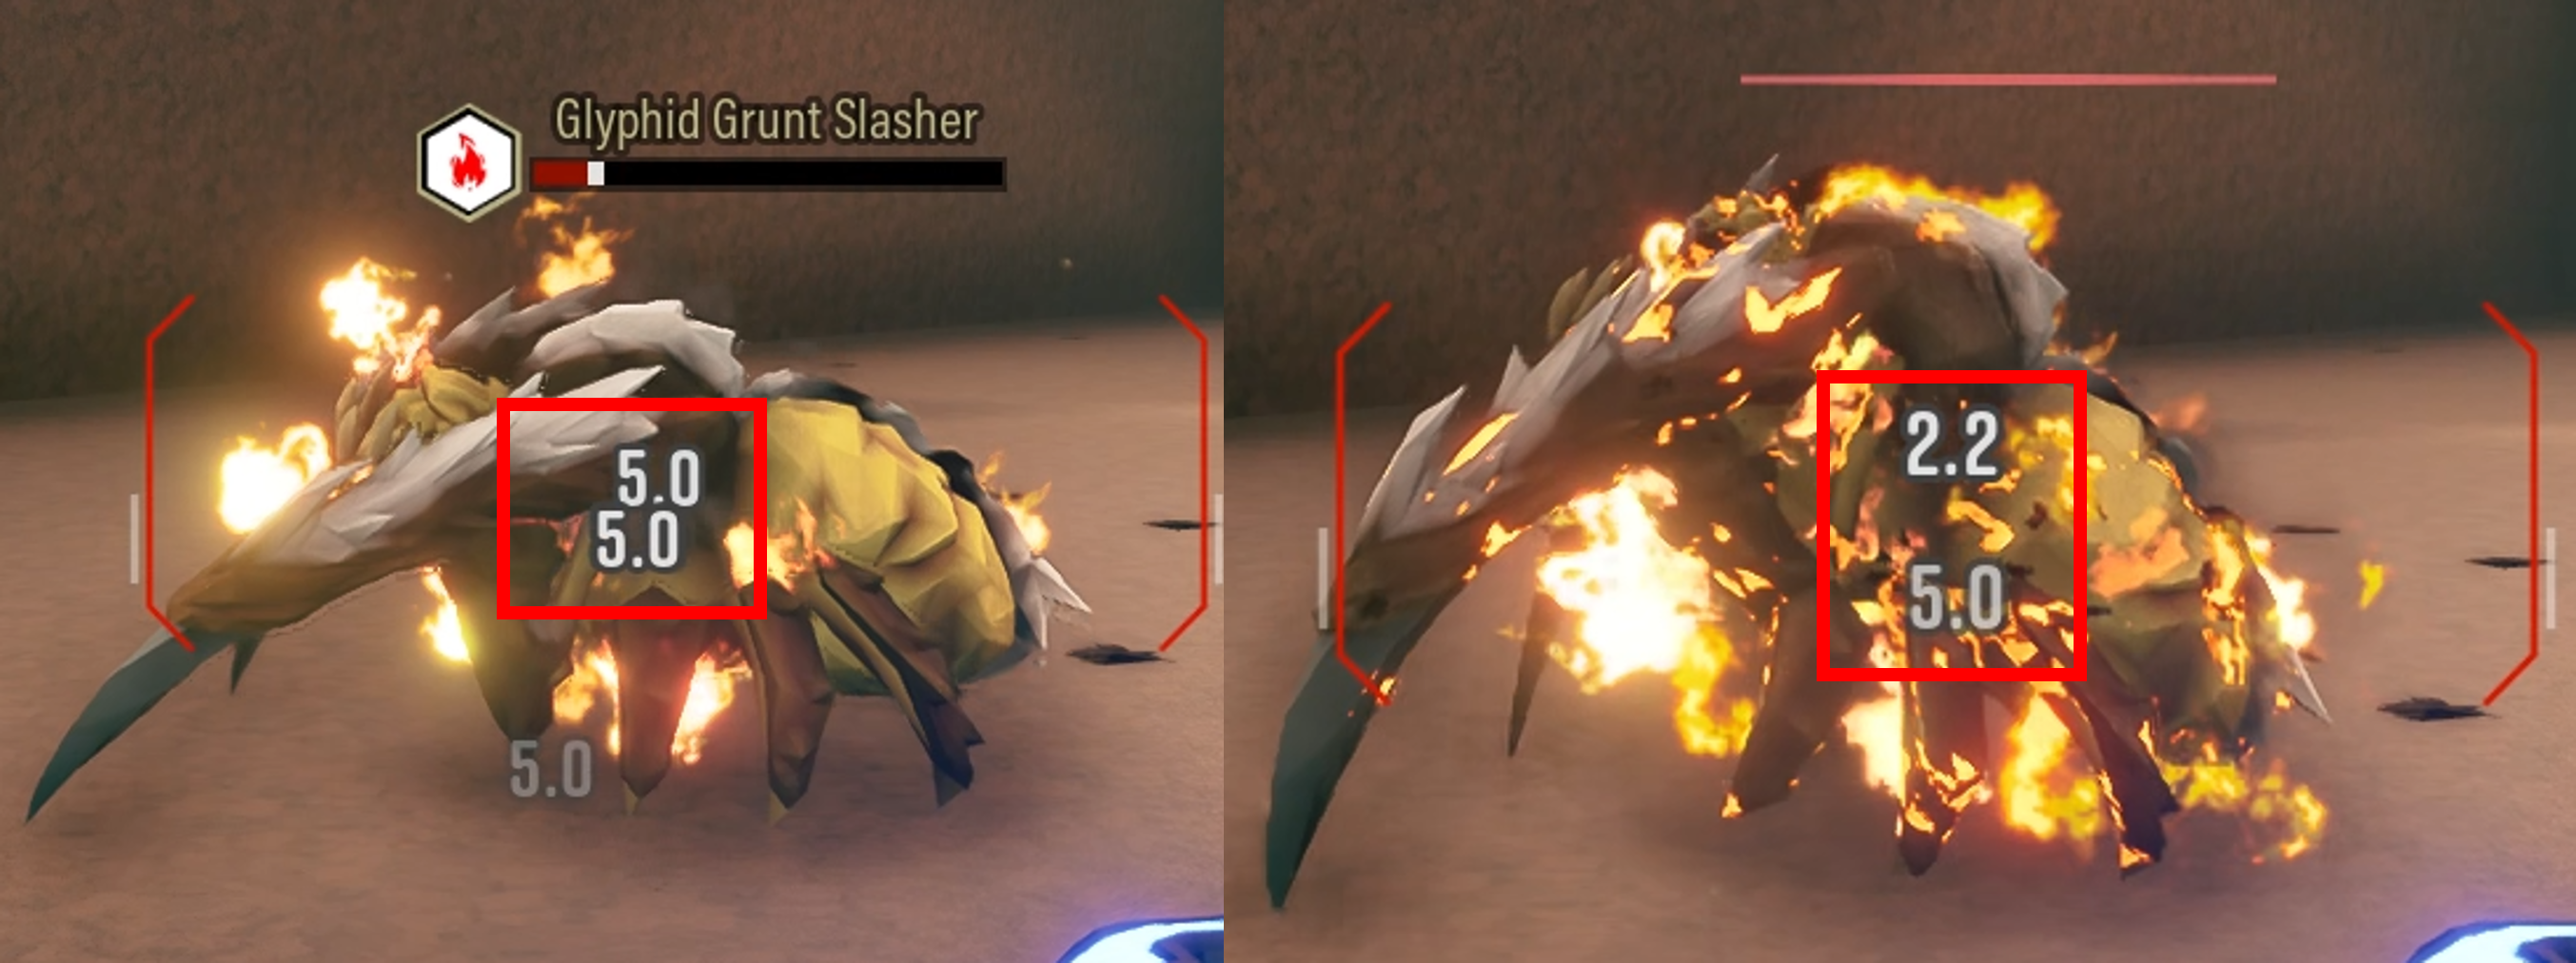
Above example: We can see our interval tick damage on the left dealing 5 damage. On the right the target dies. The “Damage Text Mod” displays 2.2 as the final tick because that is all the health that was remaining on this slasher.
 We are potentially taking a minor hit in damage (depending on the target), because most targets have some fire resistance. Haz-5 with the global resistances (highlighted in red) for example.
The Slasher effectively has 20% fire resist. Our initial shot of 80.8 has taken a small hit in damage because we know 50% of that damage is converted to fire damage and is impacted by this.
The DOT in this case has massively outstripped that drop in damage because we have dealt an additional 5 damage every 0.5 second at worst case, and potentially even more damage if we get some of the 0.3 interval ticks.
Accounting for resistances, assuming the target is only on fire for 3 seconds and worst case for each tick, that is an additional 30 damage which is not bad. But the average is going to be higher than that.
We also know in this example it is more DPS than without the fire damage because we have killed the Slasher, something this setup can’t do in one side shot without the fire DOT.
Why the radial heat damage and fire spread can be amazing!
The radial heat can end up being additional DPS beyond what our ammo can normally achieve. If we ignite a Praetorian and have it running around dealing an additional 5 heat per second to enemies around it, and if just one of those targets gets enough temperature to ignite and start taking our fire DOT damage, then it is all the better for us and our DPS.
Our example above has us dealing 80.8 damage in the initial shot but then gaining that additional DPS from the fire DOT of at worst case, 10 damage a second.
This radial heat is now potentially turning all the enemies around our first targets, into potential sources to not just take additional DPS when they ignite, but to spread that to others around it!
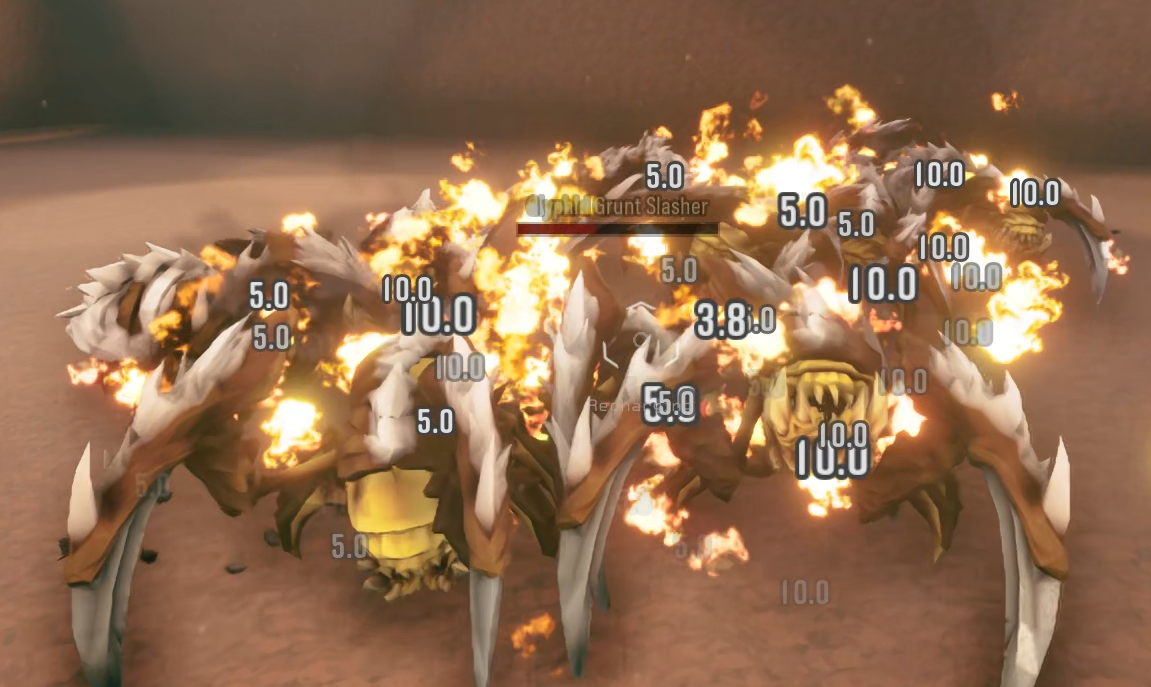 It has the potential to keep increasing the heat temperature on targets avoiding the cooling and not allowing them to douse and remove the on-fire status effect. Potentially making targets take additional fire DOT damage as they can’t cool off and keep that status effect longer.
We can also have a situation where targets that we did not originally hit in our shot, and we have not consumed any ammo to deal damage to these targets, start taking damage.
They take the radial heat damage which is the temperature increase, potentially ignite taking the full fire DOT damage, they start dealing additional radial heat to targets around them and so on. All the time increasing the fire DOT duration because they are not allowing targets around them to cool and we have potentially not even fired at these targets.
This can be an insane amount of additional damage from our single Boomstick shot! This equates to not just a huge amount of ammo saving but actually decreases our TTK (making us kill the targets quicker).
I mentioned earlier that a longer TTK on our target could be beneficial. This is why! The longer the target is on fire, the more chance it can spread it to other targets. When a single targets TTK increases because we are waiting for the fire DOT damage to finish it off, it can lower the TTK to wipe out the horde as that individual has more time to spread the fire to others.
In this simulation below I am comparing White Phosphorus vs Fear the Boomstick. At the bottom corners we can see only 2 ammo and 9 seconds to kill 12 slashers, this is with the White Phosphorus gear mod helping us cause fire damage. Fear The Boomstick on the other hand takes 11 ammo and 14 seconds to kill the 12 slashers.
This simulation is displaying everything we have looked at in this blog so far, the amount of additional damage that is potentially unlocked when we can start setting targets on fire.

You can see this simulation run and a lot more about fire spread and the Boomstick in my video here:
Boomstick Analysis Video
Summary
Since going over to using the overclock Inferno on the Breach Cutter, I have become a fire damage convert. I was pushing myself on modded difficulties and trying to crack some challenges on Hazard 7. I remember trying Inferno and loaded into a Haz 7 attempt, I thought I had made a mistake on selecting the difficulty because it felt like Haz 5!
The potential for additional DPS with fire damage/ignite/spread is very strong but it is of course not the only way to play Deep Rock. Fire based weapons can cause issues in teams with mixed elements which are competing; igniting gas clouds for additional friendly fire damage and lowering your damage against targets with high fire resist or that can’t be ignited. I have also seen powerful team compositions involving plenty of freeze.
What I am suggesting is that if you have written off fire/heat options, it might be good to go back and give them a second chance, you might just find they are more powerful than you initially thought.
About the author
My handle is Gaming Existence and I create YouTube videos where I analyse the guns of Deep Rock Galactic. I run in game simulations and look at the data to discover interesting results. I upload a video about each month time allowing!
My channel is below, I hope this blog was useful to you and thank you to Karl.gg for letting me guest blog on the site. Rock and stone!
https://www.youtube.com/c/GamingExistence

Stay around! Additional information!
The difference between fire damage and heat damage is really important as I hope you have realised from reading this article! MeatShield has handily provided some information from a brain dump he sent me in the list below. I highly recommend you check it out and double read the Wiki entries when it comes to fire damage and heat damage!
Sources of Heat that players can use:
- Flamethrower: direct stream, Sticky Flames, and T5.A "Heat Radiance"
- Subata T5.A "Volatile Bullets" adds Heat to enemies that are already On Fire, which prolongs the DoT duration
- EPC T5.C "Plasma Burn"
- Collette Wave Cooker T3.B "Temperature Amplifier" extends the On Fire duration and makes burning enemies radiate extra Heat around them
- Collette Wave Cooker T5.C "Exothermic Reactor" deals Heat in an AoE around any burning enemy that it applies Temperature Shock to
- LOK-1 T3.A "Electro-Chemical Rounds" is like Subata, adding Heat to burning enemies and prolonging the DoT duration
- PGL T3.A "Incendiary Compound"
- Breach Cutter OC "Inferno"
- Shard Diffractor baseline, and enhanced by T4.A "High-Intensity Heating"
- Minigun T5.A "Aggressive Venting"
- Minigun T5.C "Hot Bullets"
- Minigun OC "Burning Hell"
- Hurricane T5.A "Napalm-Infused Rounds"
- Revolver OC "Volatile Bullets" is just like Subata
- Coil Gun OC "Hellfire"
- Incendiary Grenade
- Drak-25 OC "Aggressive Venting"
- Drak-25 OC "Thermal Exhaust Feedback"
- Boomstick T5.C "White Phosphorus Shells"
- Crossbow OC "Fire Bolt"